Version Number: v1.0.2
Published Date: 05 Mar 2026
____________________________________________________________________________
Creating a Trigger
Creating a trigger is straightforward:
-
Click ‘Add event’ to open a new trigger in edit mode.
-
Use the ‘Cancel’ button to undo unsaved changes or delete a new, unsaved trigger.
Labelling your Trigger
The label serves as a clear and easily understandable description of when the trigger will be activated. You have the choice to create your own label or utilize Edgescan's auto-generation feature (The T button). This can be achieved by either sticking with the default label or opting for the auto-generate option. Furthermore, the label is typically included in the notification (event payload) that is dispatched when the trigger is activated.

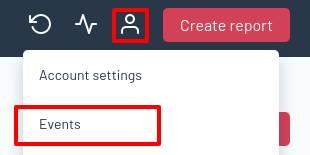
Overview of Existing Events
When you create or set up a trigger, it will appear as a summary on the Events Page. This summary includes information about the trigger's label and how notifications will be sent. By clicking on the trigger's summary, you can easily access it in edit mode to make any necessary changes or review it further.
Status icons appear to the left of the summary for each trigger. An asterisk ‘*’ indicates a trigger with unsaved changes. 
Event Types
Triggers are specifically designed to respond to particular events. For instance, you can set up a trigger to activate when a vulnerability is detected on an Asset and the risk level is classified as high. Triggers can also be customized to activate based on specific conditions related to asset visibility:
- All Assets: This option enables the trigger to activate for any asset within your scope.
- Selected Assets: Select specific assets for which the trigger should be activated. This feature is perfect for focused monitoring.
- Assets Tagged: Utilize this setting to activate the trigger for assets labelled with specific tags. You can choose whether any or all specified tags on an asset should match to trigger the event.
Additionally, you have the option to customize the level of detail included in the email notification, whether it's a concise summary or a comprehensive report.

Further information about the tailoring and details associated with each of these events are available in the Event details section.
The following are the available event types and the conditions that trigger them:
- Assessment Complete: This event is activated once an Edgescan analyst completes the evaluation of an asset.
- Assessment Start: This event is triggered at a set time before an assessment begins on an asset.
- Vulnerability Opened/Closed: This event responds to the opening or closing of vulnerabilities on an asset during an evaluation.
- Host Discovered/Down: This event is activated when new hosts are discovered or when hosts go down on an asset in ASM.
- Port Opened/Closed: This event triggers when changes in port status (opened/closed) are detected on an asset in ASM.
- Node Added: This event fires when a note is added to either an asset or a vulnerability.
- Port Verification Complete: This event informs users about the completion of a mapper port verification scan and any changes in port status (Open/Closed/Unchanged).
- Credentials Added Notification: This event alerts if credentials are added for specific users on specified assets.
- Asset Blocker Created: This event is triggered when a blocker preventing asset evaluation is created.
- Asset Blocker Verified: This event triggers when an Edgescan analyst confirms that a blocker is still in place.
- Asset Blocker Resolved: This event is activated when a blocker is cleared.
- SLA Violation Event: This event alerts users when a service level agreement threshold is breached.
Notification Options
Edgescan supports multiple notification methods (Email, Web-hook, SMS, and Feed), with customizable options for email and web-hook notifications.
Email Options:
- Send to My Email: By default, triggers send notifications to the user's account email.
- Additional Email Addresses: Specify other emails to receive notifications.
- Subject Line: Customize the subject line of notification emails.

Webhook Options:
-
URL: Specify the request URL, starting with 'http://' or 'https://'.
-
HTTP Method: The default method is 'POST'.
-
Additional Headers: Define any additional header-value pairs for the request.
-
Validate SSL: Ensures the SSL certificate of the URL is verified.
-
Use Payload: Choose between XML or JSON formats for the default payload, with specific options for Slack and Microsoft Teams integrations.

Advanced Mode
In the Advanced Mode, you have more control over event triggers and notification contents. To access this mode, simply click the button located at the top right of the edit pane.

Within Advanced Mode, you can precisely set the conditions for triggering an event. This is done in a text area where conditions are expressed as a JSON object. The object allows you to combine logical operators and field comparisons within the context of the event. For detailed information on operators and comparisons, you can refer to the Edgescan events documentation.

Furthermore, Advanced Mode enables you to customize the format and content of notification payloads for all notification methods. While each method comes with a default payload format, you can create a custom payload by selecting ‘Custom…’. Custom payloads utilize mustache templates, which can be based on an existing template and personalized by clicking ‘Customize payload’. For more insights on the available context for payload templates, you can consult the Edgescan Events documentation.
Cloning Events
If you need a new event similar to an existing one, use the clone button to create a duplicate with all the original settings. This new event will have "(copy)" appended to its name, and you can then modify it as needed before saving, just like any other event.
Toggling Events
Each saved event includes a toggle switch for quick activation or deactivation. This feature allows you to temporarily turn off an event without deleting it, giving you flexibility in managing event notifications:
- Turning On: The switch will be on the right with a green background, indicating the event is active.
- Turning Off: The switch moves to the left with a white background, showing that the event is inactive.